Admin: Create Your Society and Import the Roster
Admin: create your society and import the roster
From a cold sign-in to a full member roster with invites ready to send, in ten to fifteen minutes. Every screen below is a real capture of the app.
Time: 10 to 15 minutes · You need: an owner list as CSV or Excel · Works on: desktop and mobile
Before you begin
- Your owner list as a CSV or Excel file. Any export works: ApnaComplex, MyGate, a committee spreadsheet, even a list typed in Excel this morning.
- At minimum, one column of unit numbers. Everything else, including names and emails, is optional and can follow later.
- An email address you can sign in with. Whoever creates the society becomes its first admin.
One decision you cannot undo: you will pick what kind of place you run. The three residential types can be swapped later. A company office cannot become a residential community afterwards, or the other way round.
The screenshots here show an apartment society, where units are called flats. On a colony, villas or an office the wording changes to match. The steps and buttons are identical.
Step 1: Create the society
Sign in at /login with your email or phone, then choose Join a society on the onboarding screen. That card covers both joining an existing society with a code and starting a new one.
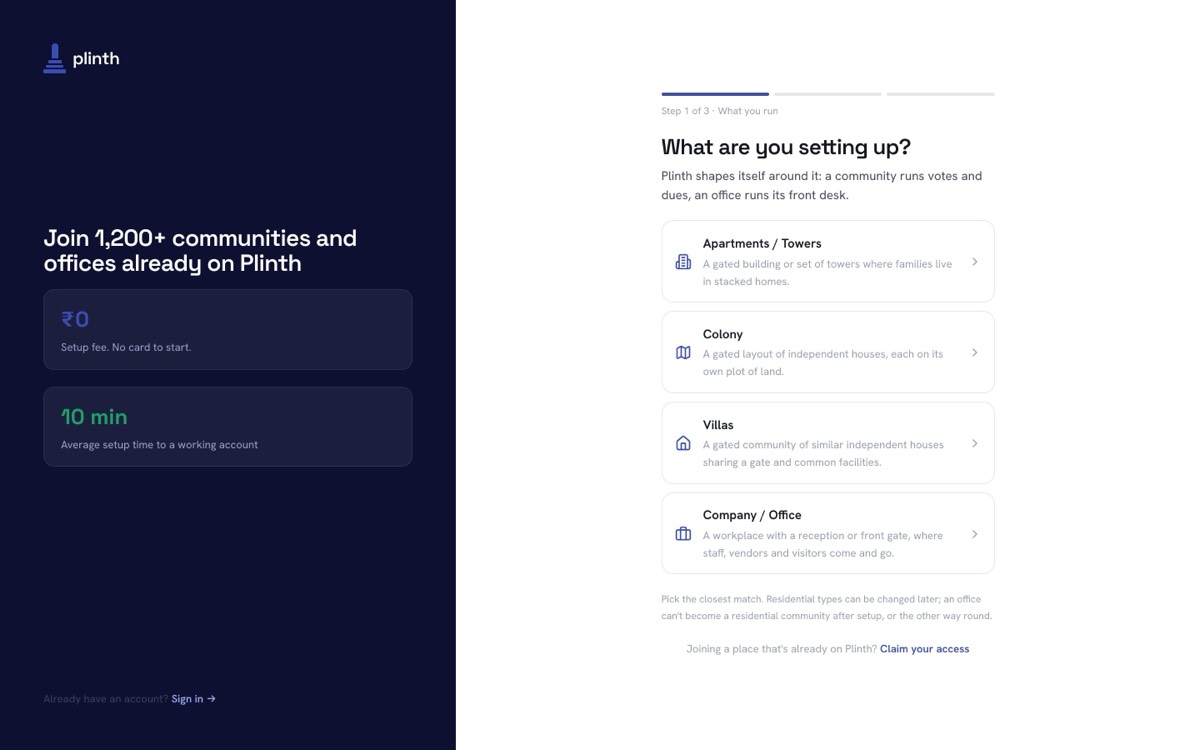
Pick what you run. This choice shapes the whole product, and sets the word Plinth uses for a unit everywhere else in the app.
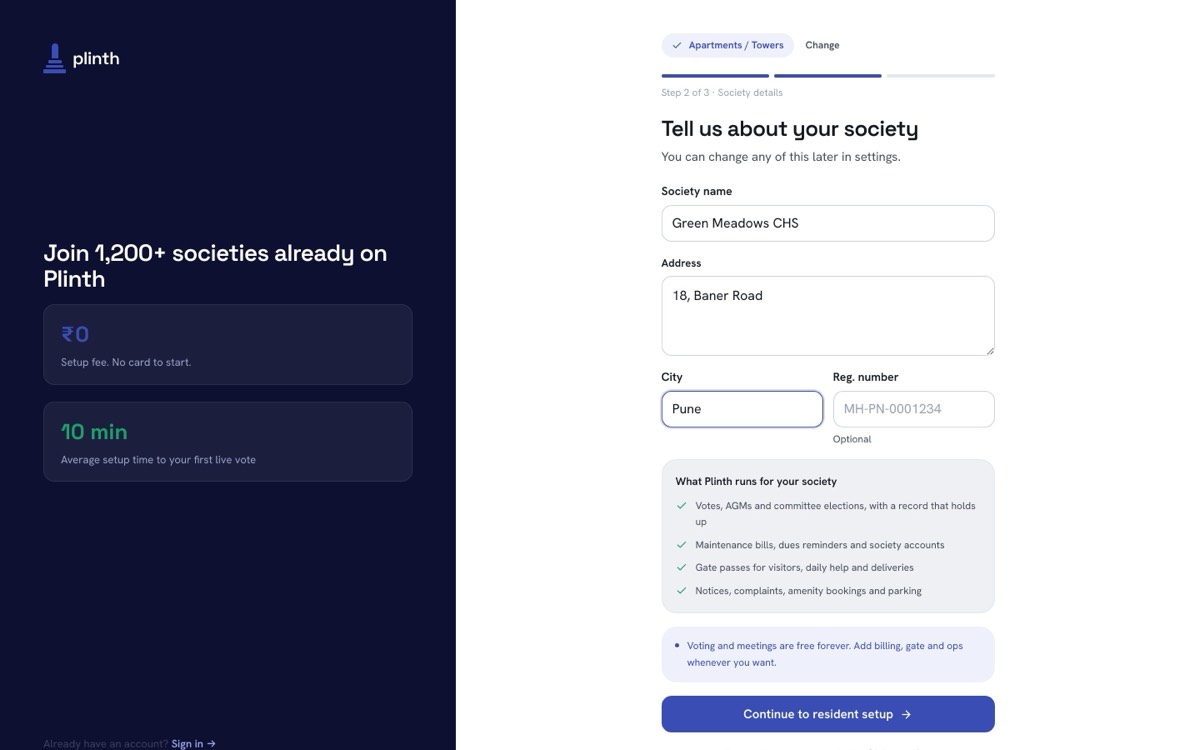
Then name it. Only the name is required; address and city help residents recognise the right society when they claim, and the registration number is optional.
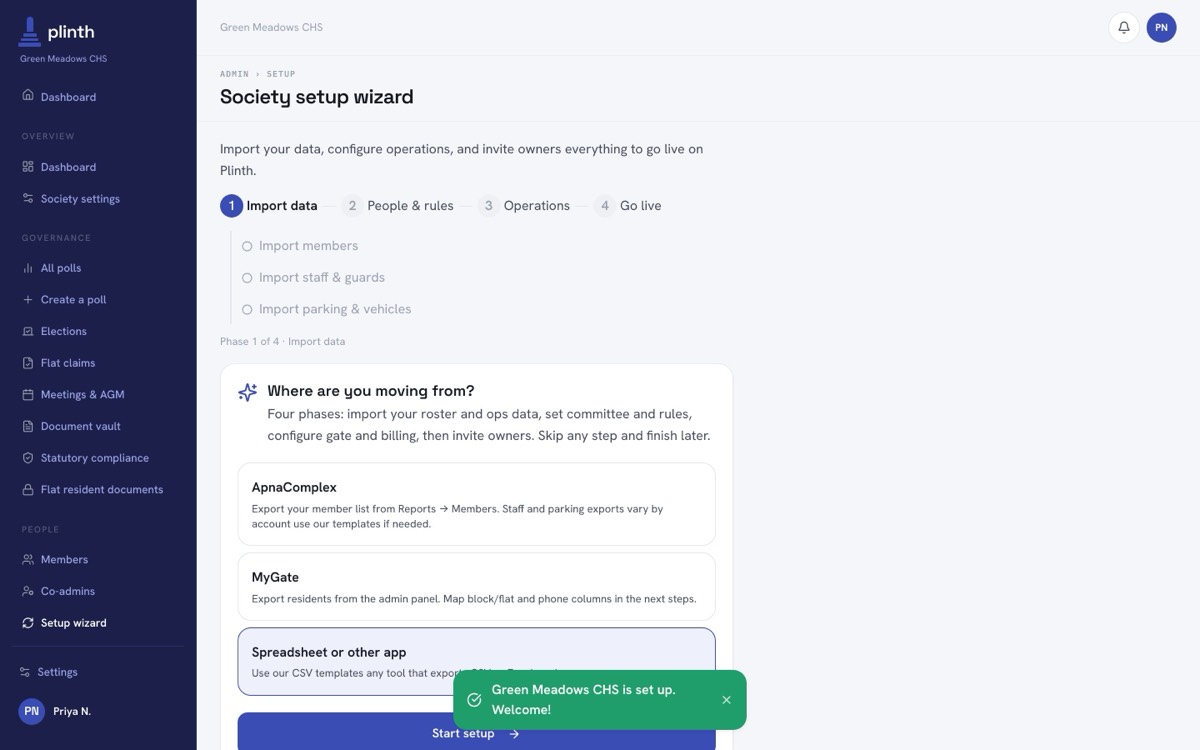
The society now exists, you are its admin, and Plinth drops you into the setup wizard.
Step 2: Start the setup wizard
The wizard runs in four phases: import data, people and rules, operations, then go live. Choosing your old app only tailors the hints on later screens, so pick Spreadsheet or other app if you are unsure.
Step 3: Prepare the roster file
Plinth reads whatever headers your file already has, so you do not need to rename columns before uploading. Only the unit number is required.
| Field | Required | What it does | Headers matched automatically |
|---|---|---|---|
| Flat number | Yes | Identifies the unit; rows without it are rejected | flat no, flat, unit, unit no, apt |
| Block | No | Wing or tower; keeps A-101 and B-101 apart | block, wing, tower, building |
| Owner name | No | Shown across roster, directory and vote records | name, owner, member name, resident name |
| Owner email | No | Where the invite goes, and how the owner is matched at sign-in | email, email address, owner email, mail |
| Owner phone | No | Second way to match an owner at claim time | phone, mobile, contact, mobile no, cell |
| Alternate email | No | A second address also accepted for voting | alt email, email2, secondary email |
| Alternate phone | No | A second number for the same owner | alt phone, phone2, secondary phone |
| Membership ID | No | Your society membership number, carried into records | member id, member no, membership id |
| Ownership share | No | Vote weight for weighted polls; defaults to 1 | share, weight, vote weight |
| Area (sq. ft.) | No | Feeds per-square-foot maintenance billing | area, sqft, carpet area, built-up area |
The upload screen has a Download template button that saves a starter CSV with these columns.
File rules: CSV, XLSX or XLS up to 50 MB, and only the first sheet of a workbook is read. Row one
must be the header row, and error messages count it as row 1, so the first owner is row 2. Phone
numbers import most reliably as +91XXXXXXXXXX. If a very large roster fails in one pass, split it
into files of about 500 rows.
Step 4: Upload the roster
There are three ways in, all writing to the same roster:
- The setup wizard at /admin/migration, for your first upload. It also imports staff and parking, and ends by inviting everyone.
- Members → Import at /admin/members/import, for adding a block or fixing a batch later. Members only, three steps.
- Add member on the Members page, for a single new resident. No file involved.
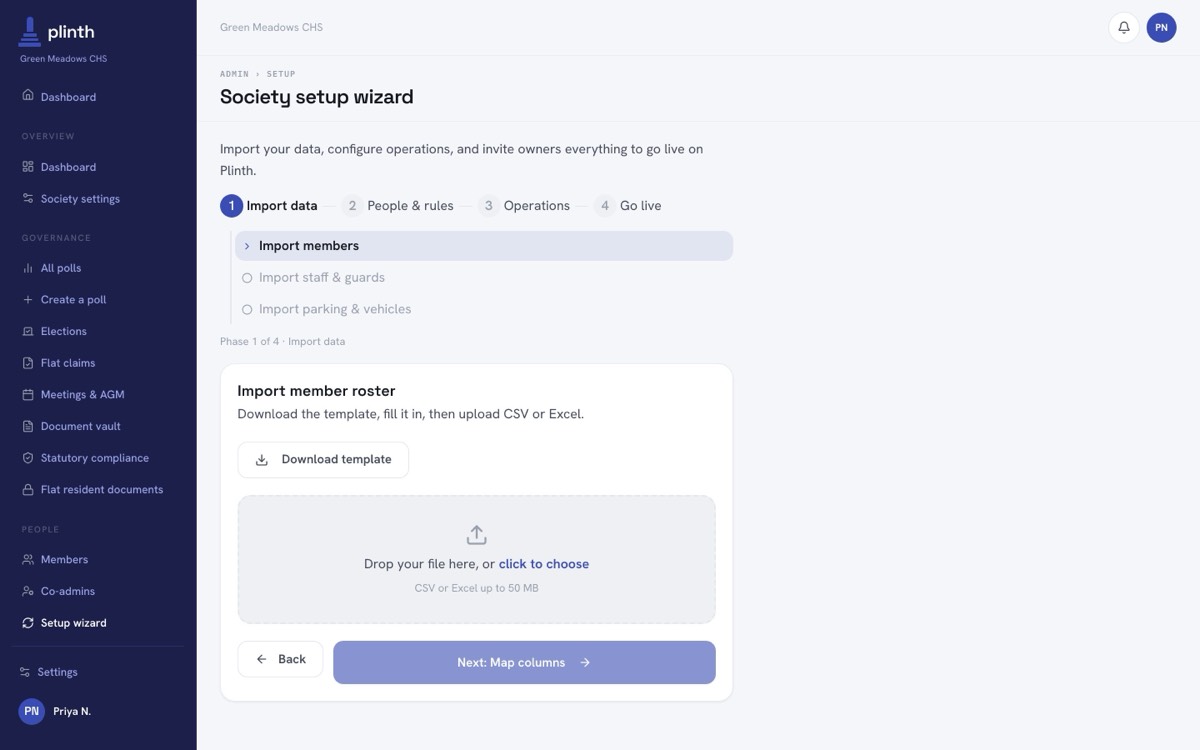
Drag your file onto the upload area or click to choose it. On a phone this opens Files or Drive.
Step 5: Check the column matches
Plinth reads your header row and matches what it recognises. Read this screen rather than skipping
it. In the capture below it matched Flat No, Wing, Owner Name and Mobile on its own, but
left Owner email unmatched because the file calls that column Email ID, which is not a spelling
it knows. Importing as-is would have produced a roster with no email addresses, and therefore no
invites.
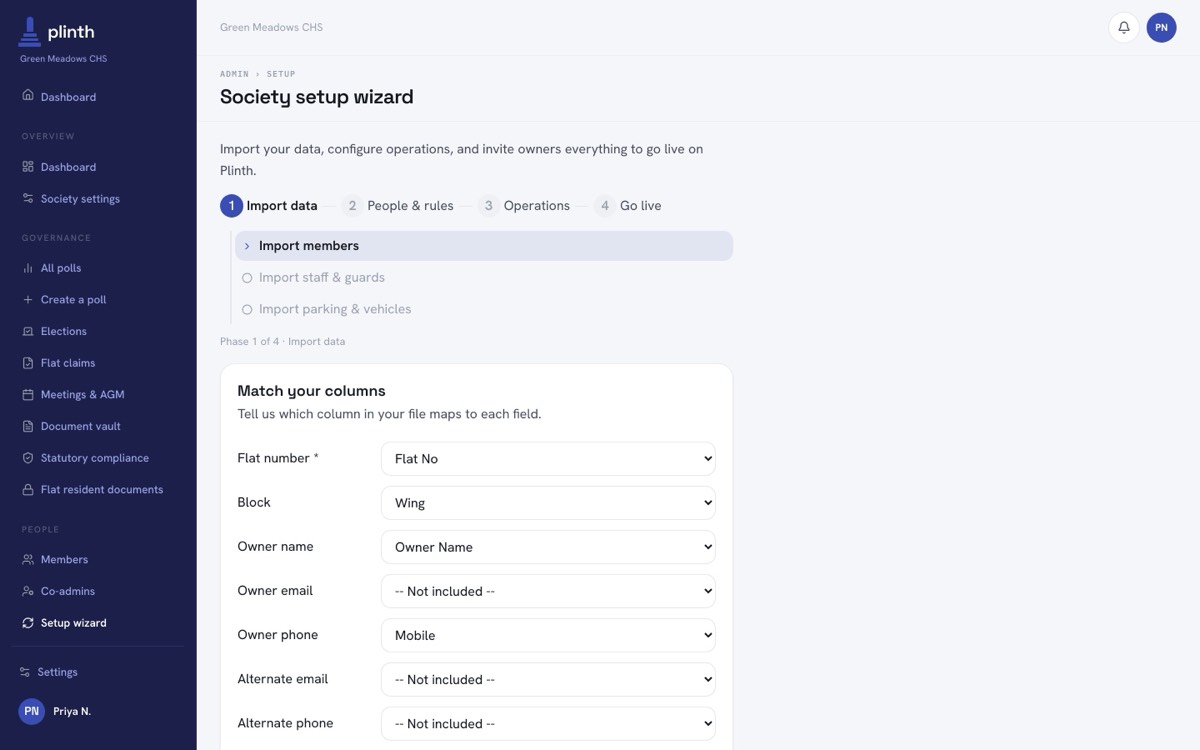
Scroll down on the same card for a preview of the first ten rows exactly as Plinth read them, then Run import. Checking one familiar row in the preview is the cheapest way to catch a file exported with the wrong delimiter or a stray header line.
Step 6: Read the result
Import runs on the server and reports how many rows went in out of how many were read.
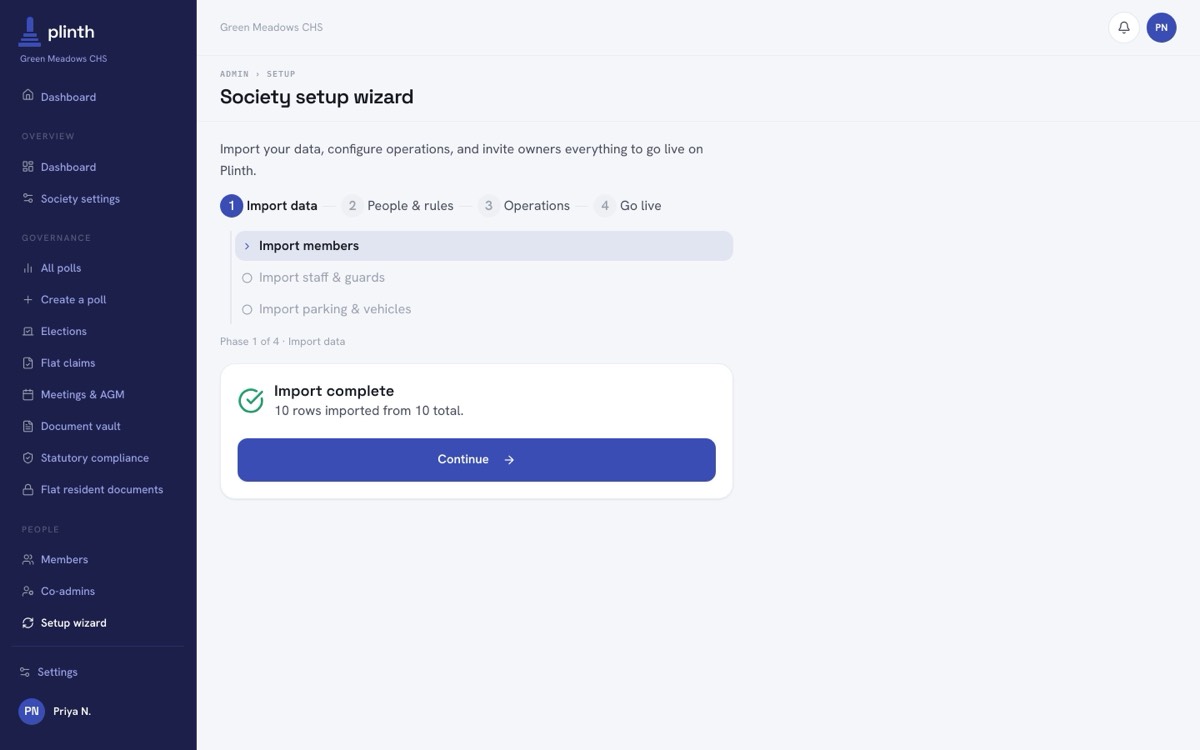
Bad rows never block good ones. Anything that failed is listed with its row number, the field at fault, and what was wrong.
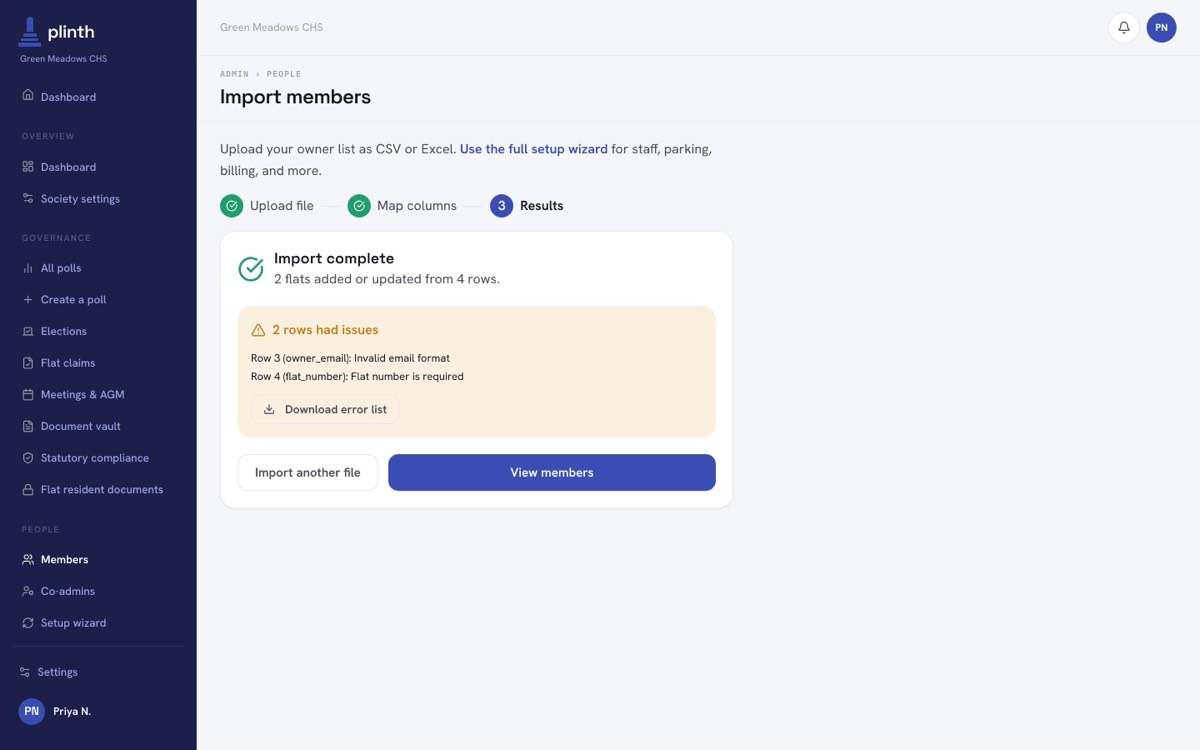
Fix those rows in your original file and upload the whole file again. Re-importing updates what already exists rather than duplicating it, so you never have to cut the good rows out first.
Step 7: Check the roster, add anyone missing
Open Members to see the roster. Every owner arrives as Unclaimed, which means that person has not signed in and linked their account to the unit yet.
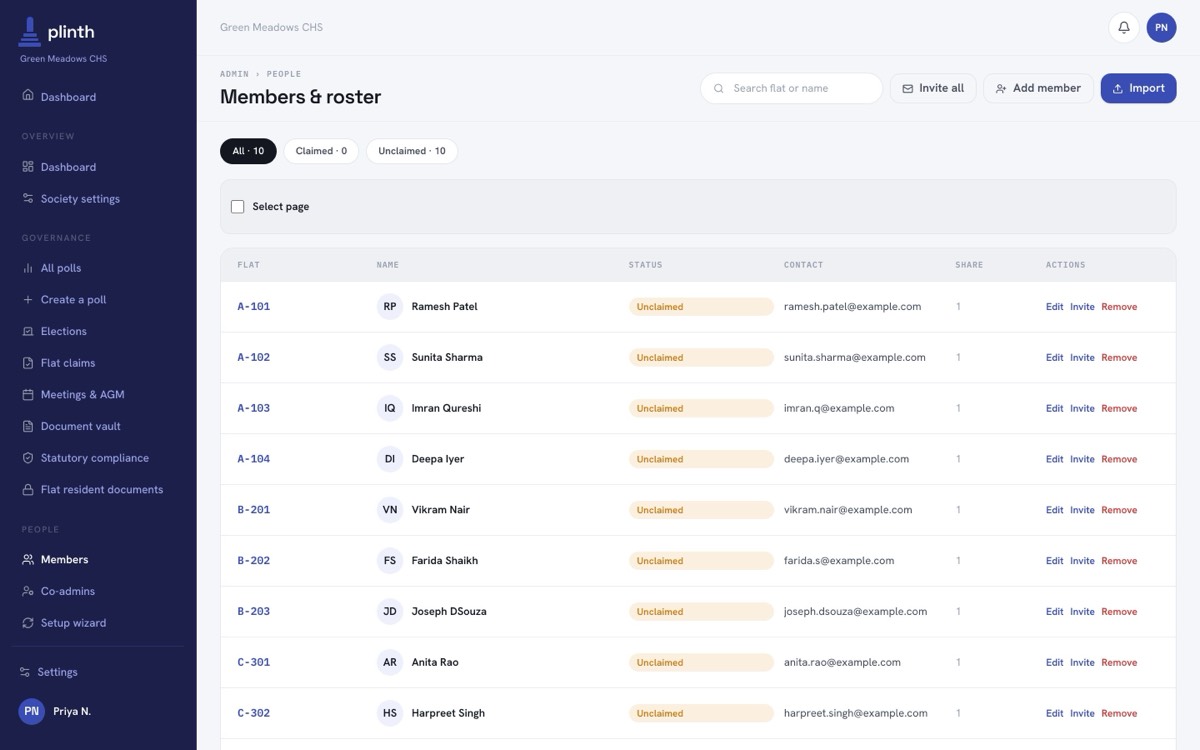
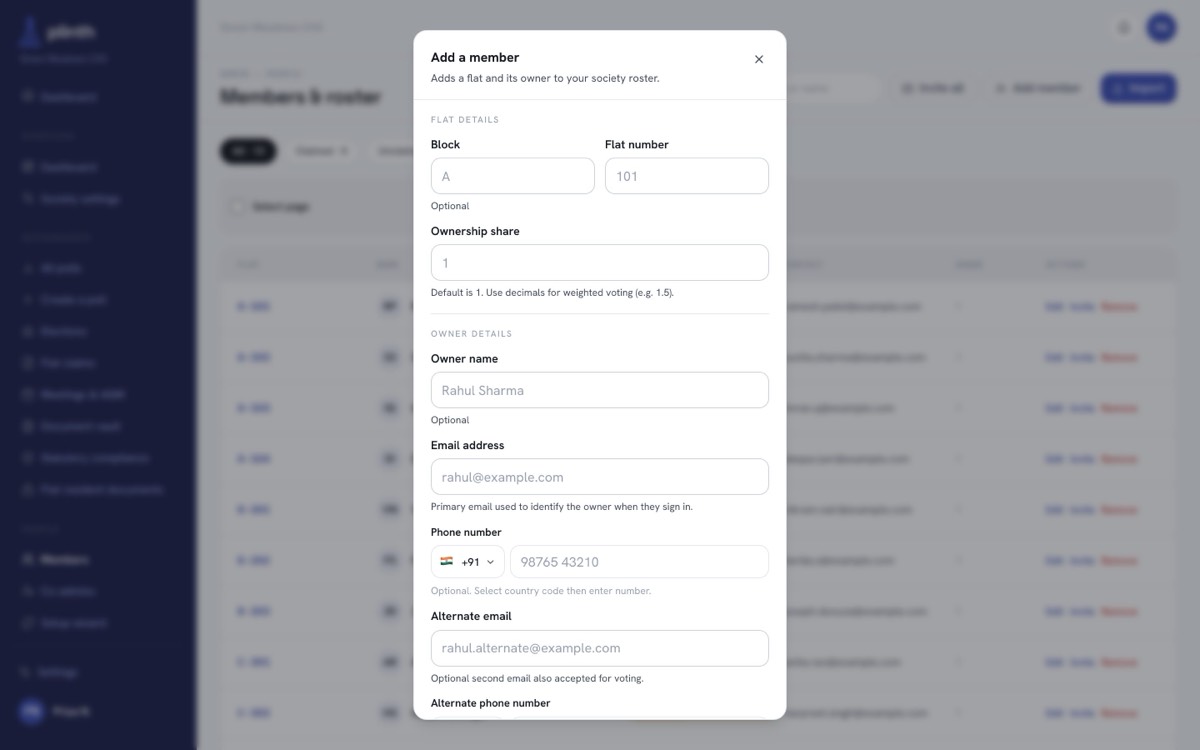
For a single new resident, Add member is faster than a file. Only the unit number is required.
Step 8: Invite the owners
Invite all on the Members page emails a sign-in link to every unclaimed owner who has an email address on file. Owners with no email are skipped silently, which is one more reason to map the email column properly. The Invite link on any row sends to that one owner.
The owner opens the link, signs in, and Plinth matches them to their unit. When the contact details match exactly and unambiguously the claim is approved on the spot; anything less exact becomes a pending request under Flat claims. Send your residents the companion guide, Claim your flat and cast your vote, so they know what the email is for.
Re-importing later
- Uploading the same file twice does not duplicate anything. Units are matched on block plus unit number, so a repeat import updates the existing record.
- A blank cell does not erase anything. Leave the area column out of a later file and stored areas stay as they are.
- Careful with claimed flats. If you re-import a row whose owner details have changed and that unit is already claimed, Plinth unlinks the claim, because changed owner details usually mean the flat changed hands. That resident will have to claim again. Check the Claimed filter before a bulk re-upload of a live society.
To start the wizard's member step over, open Setup wizard and press Restart import on the members card. It only re-runs that step.
Troubleshooting
| What you see | What it means | What to do |
|---|---|---|
| Flat number is required | That row has no unit number after column matching | Check the unit column is matched, then check the row is not blank |
| Invalid email format | The cell is not a usable address | Fix it or clear it; a blank email imports fine, it just means no invite |
| Could not parse phone number | Not a form Plinth can normalise | Rewrite as +91XXXXXXXXXX; watch for Excel using scientific notation |
| Area must be a number above 0 | The cell holds text, zero, or "950 sqft" | Digits only. Blank keeps any area already on record |
| Match the Flat number column before importing | The required field is still on "Not included" | Pick your unit column; import stays disabled until you do |
| All owner emails missing after import | The email column was never matched | Re-upload the same file and set Owner email by hand; units update in place |
| An owner never got the invite | No email on file, or it went to spam | Check the address with Edit, then use the row's Invite link |
| A very large file fails | Too big to finish in a single pass | Split into files of roughly 500 rows; order does not matter |
| No Import button on Members | You are on a narrow screen, where it is not shown | Use Setup wizard or Import members only in the navigation |
Where everything lives
| To do this | Go here |
|---|---|
| Create a society | /onboarding/create-society |
| Run the full setup | /admin/migration |
| Import the roster only | /admin/members/import |
| See and edit the roster | /admin/members |
| Review pending claims | /admin/claims |
| Change name, address or rules | /admin/settings |
Questions? Email support@plinth.life, or read Admin: review claims and credentials for what happens after the invites go out.
WAS THIS HELPFUL?
RELATED ARTICLES